 Save
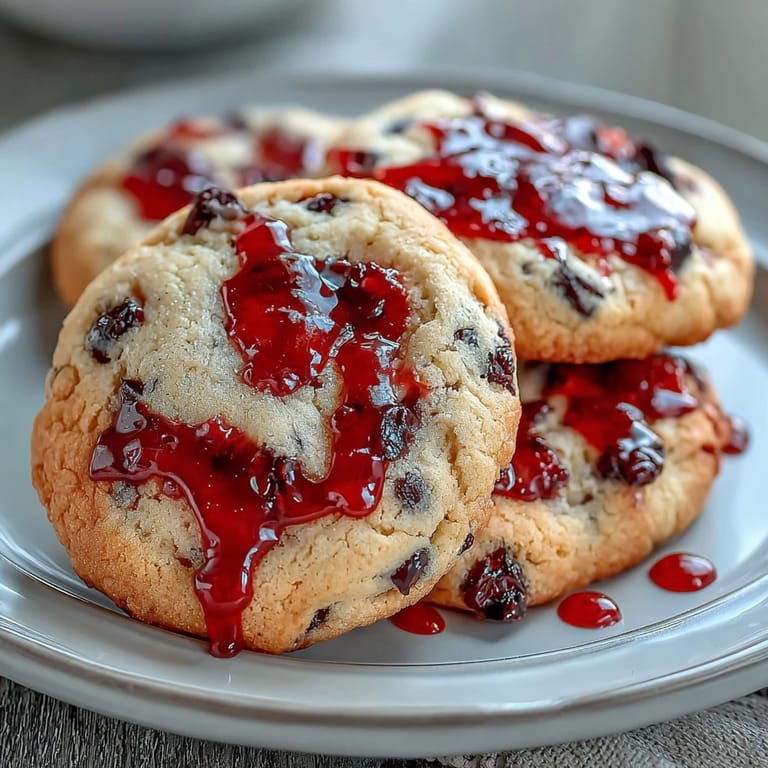
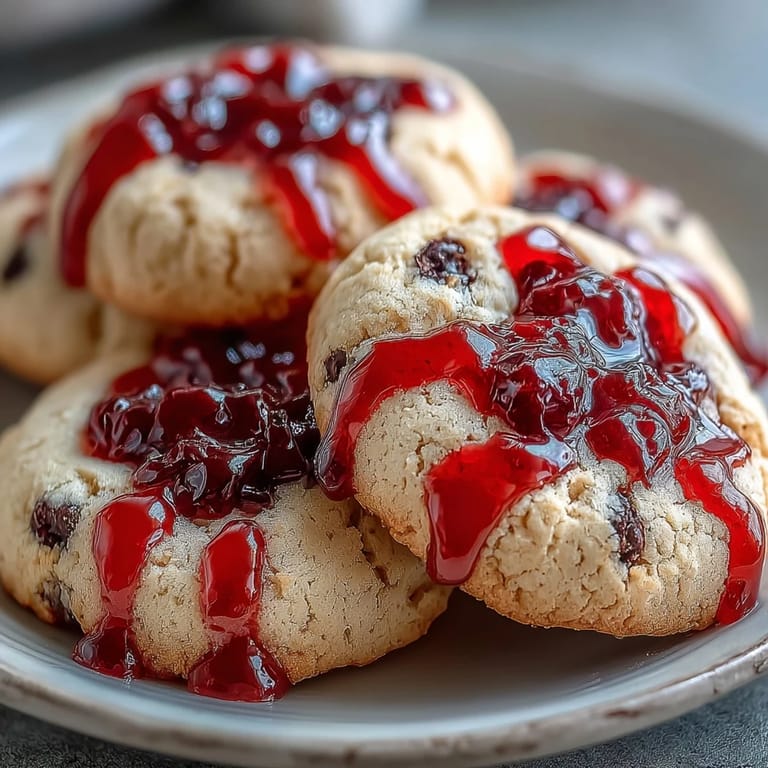
Save My neighbor knocked on the door last October with a box of these vampire bite cookies, and I immediately understood why she'd become slightly obsessed. The moment I bit into one, the red icing squished out like something wonderfully theatrical, and I was grinning like a kid at a haunted house. She confessed she'd made three batches the night before because the first two batches disappeared before she could even plate them for the party. By the time she left, I'd already decided these would be my secret weapon for every Halloween gathering from that point forward.
I made these for a work Halloween party where the energy had been pretty flat, and watching grown adults light up over glorified sugar cookies felt like small magic. One colleague kept examining them under the office lights like they were precious gems, and suddenly people were trading cookies and asking for the recipe. By the end of the day, what started as nervous party appetizers had somehow become the thing everyone remembered about that afternoon.
Ingredients
- All-purpose flour (2 1/4 cups): This is your cookie foundation—don't overmix once the flour is in, or you'll end up with tough cookies instead of tender ones that cradle the red icing beautifully.
- Unsalted butter (3/4 cup): Softened, not melted, because the creaming process traps air and gives you that luxurious tender crumb.
- Granulated sugar (1 cup): This creams with the butter to create lift and sweetness; if you only use powdered sugar, the cookies flatten into hockey pucks.
- Large egg: One egg is all you need to bind the dough without making it cakey or too cake-like.
- Pure vanilla extract (1 1/2 tsp): Use real vanilla—imitation won't give you that subtle warmth that makes people wonder what's so good about these simple cookies.
- Baking powder (1/2 tsp): Just enough lift to keep things tender; too much and your cookies taste like a chemistry experiment.
- Salt (1/4 tsp): This tiny amount doesn't make cookies taste salty; it amplifies the vanilla and butter and prevents sweetness from becoming cloying.
- Powdered sugar for icing (1 cup): Sifting it prevents lumps that would make your icing grainy instead of smooth and glossy.
- Milk (2–3 tsp): Add it slowly—you control the consistency, thick enough to pipe but loose enough to drip like something sinister.
- Light corn syrup (1/2 tsp): This sounds unnecessary until you see how it makes the icing shimmer like fresh blood instead of sitting matte.
- Red gel food coloring: Gel is more concentrated than liquid, so a tiny drop goes further and doesn't thin out your icing.
Tired of Takeout? 🥡
Get 10 meals you can make faster than delivery arrives. Seriously.
One email. No spam. Unsubscribe anytime.
Instructions
- Set yourself up for success:
- Preheat your oven to 350°F and line two baking sheets with parchment paper so you're not scrambling when the dough is ready. This is the moment to actually read through the rest of the steps instead of discovering halfway through mixing that you forgot to sift the powdered sugar.
- Build your dry team:
- Whisk flour, baking powder, and salt in a medium bowl so they're evenly distributed and there are no hidden pockets of salt or powder. You're creating a uniform mixture that will make every cookie taste exactly the way you want it to.
- Cream the magic into existence:
- Beat softened butter and granulated sugar together for about two minutes until the mixture looks light, fluffy, and pale—like fluffy clouds that smell like butter. This process incorporates air, and that air is what keeps your cookies tender instead of dense.
- Add your wet ingredients:
- Drop in the egg and vanilla, beating until everything is combined and the mixture looks almost custardy. Stop when you don't see streaks of egg anymore; you're not whipping meringue here.
- Marry the dough:
- Gradually add the flour mixture on low speed, mixing just until you see no more white streaks of flour and the dough comes together. Overmixing from this point turns your cookies tough, so resist the urge to beat it into submission.
- Shape and bake:
- Scoop tablespoon-sized portions, roll them into balls, and place them two inches apart on your prepared sheets—they'll spread a little as they bake. Flatten each ball slightly with your palm so they bake evenly, then slide them into the oven for 10–12 minutes, watching until the edges are just barely golden while the centers still look slightly underdone.
- Cool with patience:
- Let cookies sit on the baking sheet for five minutes so they set slightly, then transfer them to a wire rack to cool completely—this prevents them from becoming too soft to hold puncture marks. Completely cool cookies are crucial for the next step.
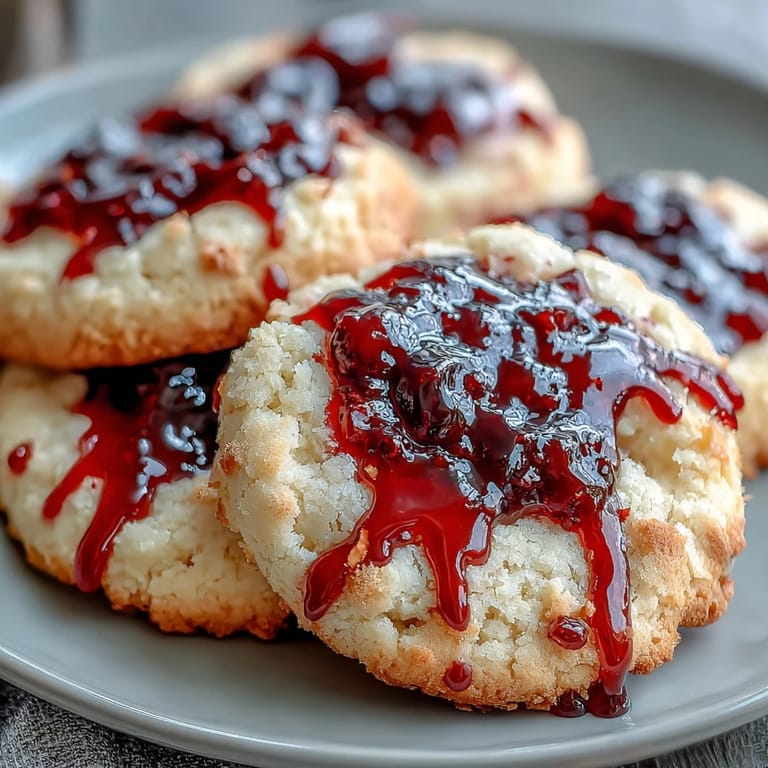
- Create the vampire bite:
- Once cooled, use a thin straw or the end of a chopstick to gently poke two marks near the edge of each cookie, going deep enough to create a small channel but not so forcefully that you crack the cookie. Think of it like a snake bite, two fang marks close together.
- Mix your blood:
- In a small bowl, combine sifted powdered sugar, milk (add it a teaspoon at a time), corn syrup, and red gel coloring until you have a thick but pipeable consistency—it should slowly fall from a spoon instead of running or sitting stiff. This is the moment where you decide how dramatic you want the effect to be.
- Fill and let it drip:
- Using a toothpick or small piping bag, fill those bite marks with red icing, allowing it to drip slightly down the side of the cookie like fresh blood starting to dry. The drip is what makes these theatrical instead of cute.
- Add finishing details:
- If you want to go full horror movie, pipe a small trail of red icing from the bite marks or add tiny dots with black or dark red gel icing to suggest fangs or veins. Let everything set before serving so the icing doesn't smudge on guests' fingers.
 Save
Save There's something about feeding people cookies decorated like little monsters that breaks down walls—suddenly everyone is laughing, trading cookies, taking photos for social media, becoming part of a shared joke. These aren't fancy pastries or complicated showstoppers; they're just butter and sugar with theatrical ambitions, and somehow that simplicity is what makes them unforgettable.
Make-Ahead Magic
Bake these cookies up to three days before your event and store them in an airtight container—they stay soft and won't stale out. Ice them the morning of your party or the night before if you want that icing completely set and glossy; they'll hold their fangs with dignity until guests arrive. The dough itself can be made a full day ahead and refrigerated, which is actually helpful because cold dough is easier to scoop and gives you slightly thicker, puffier cookies.
Flavor Riffs and Variations
The base cookie is a blank canvas, so don't think you're locked into vanilla forever. Almond extract makes an appearance in the notes, and it's genuinely gorgeous—just swap out half a teaspoon of vanilla for a quarter teaspoon of almond and suddenly everything tastes like a slightly elevated sugar cookie with depth. Lemon zest or orange zest mixed into the dough adds brightness, or a tiny pinch of cinnamon brings warmth without making things taste like chai.
Troubleshooting and Small Tweaks
If your kitchen runs warm or you're in a humid climate, chilling the dough for thirty minutes before scooping makes handling infinitely easier and prevents spread-happy cookies that flatten into wafers. If your icing sets too quickly and you can't pipe it smoothly, whisk in milk a few drops at a time until it cooperates; if it's too thin and running everywhere, add a bit more powdered sugar. For gluten-free versions, use a reliable one-to-one baking blend and expect the cookies to be slightly more delicate, so handle them gently and cool them completely before decorating.
- Keep your piping bag or toothpick warm and clean between cookies so dried icing doesn't drag and tear the soft icing lines.
- If you mess up a bite mark, just smooth over the cookie and start again—no one will know, and the icing covers imperfections like makeup.
- Make extra icing because you will absolutely use more than you think when you start getting creative with drips and details.
 Save
Save These cookies are proof that the simplest treats often become the most memorable ones, especially when you add a little theatrical flair and serve them with genuine affection. Make them with someone you love, let the messy icing-dripping part get genuinely silly, and watch people's faces light up when they see what's waiting for them.